From CommenceCRM-Help
Technowrites (talk | contribs) |
m (fixed dead-end page; added link back to Documents page) |
||
| (4 intermediate revisions by 3 users not shown) | |||
| Line 4: | Line 4: | ||
| − | [[File: | + | [[File:ScreenHunter_80 Sep. 25 14.56.jpg|left]] |
| + | 1. Use the Folder Tree in the Documents Module Activ-ity Panel to select the folder within which you wish to create a folder. | ||
| + | :::::2. Click on the “New Folder” button. | ||
| + | :::::3. Enter the name of your new folder. | ||
| + | :::::4. Tag the folder as “Public” or “Private.” | ||
| − | ::::: | + | :::::5. Click on the “Save and Close” button. |
| − | [[File: | + | [[File:ScreenHunter_81 Sep. 25 14.56.jpg]] |
| − | |||
| − | + | Return to [[Documents]] | |
| − | |||
| − | |||
| − | |||
| − | |||
| − | |||
| − | |||
| − | |||
| − | |||
Latest revision as of 21:25, 7 June 2013
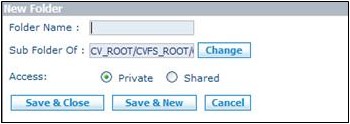
After using the Documents Module Activity Panel to navigate to the folder within which you wish to create a folder, click on the “New Folder” button. Enter the name of your new folder on the “ Edit Folder” dialog. Then click on “Save and Close” to create the new folder.
1. Use the Folder Tree in the Documents Module Activ-ity Panel to select the folder within which you wish to create a folder.
- 2. Click on the “New Folder” button.
- 3. Enter the name of your new folder.
- 4. Tag the folder as “Public” or “Private.”
- 5. Click on the “Save and Close” button.
Return to Documents
