Adding Steps to a Marketing Program
From Commence CRM-Help
After you have created a marketing program you can then add the step or steps that represent the actions to be executed as part of the program.
Note: Drip marketing steps must be added in On Demand using Internet Explorer.
To access the Marketing Program Details screen:
1. From the Accounts module or the Leads module select Marketing Program from the Home section of the screen. The marketing program listing screen displays.
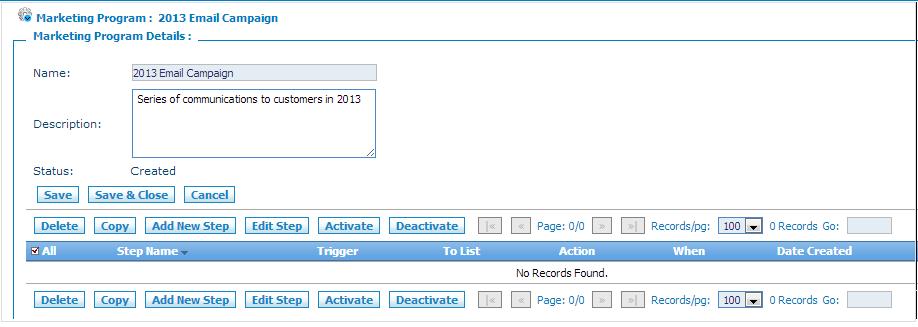
2. From the listings page, click the name of the marketing program to which you'll be adding steps. The Marketing Program Details screen displays.
From this screen you create the steps or steps for your marketing program. You can also copy similar steps and then modify each one individually.
To Add Steps
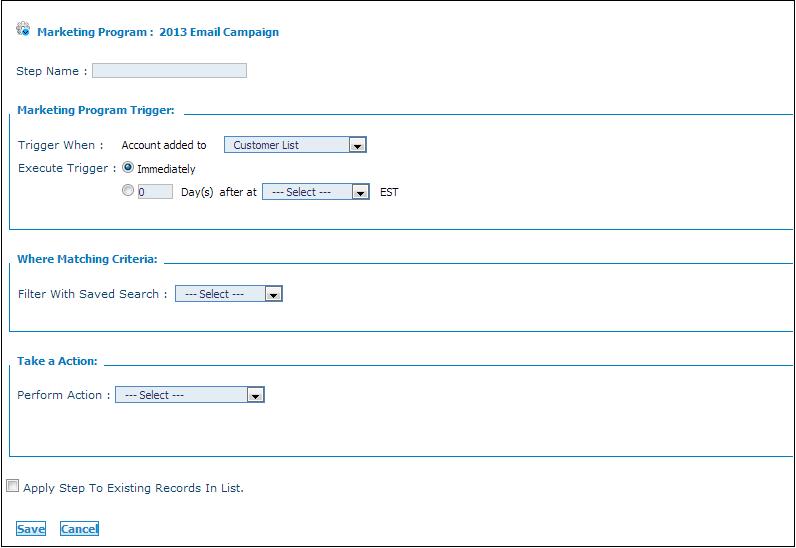
1. Click Add New Step. The Step Detail screen displays.
2. Enter a name in the Step Name field. For example:
- For email campaigns this could be "Send Welcome Email Message"
- For account task management this could be "Place Welcome Call to Customer"
3. Set the marketing program trigger:
- Select the account or lead list to associated with this marketing program step.
- Indicate when the trigger should be executed
4. Using a saved search, indicate specific criteria that the account or lead must meet in order for the trigger to execute, if applicable. For example, a saved search that includes only leads with a status of Assigned.
5. Indicate what action should be taken when this step is triggered.
- Send Email: You will be prompted to select an email template and and adddress for the email sender.
- Add Activity: You will be prompted to select the activity type (call, appointment, or to-do), to whom to assign the activity and when to schedule it.
- Assign Lead (Leads module marketing programs): You will be prompted to select an existing lead assign rule. For instructions to create lead assign rules, see How to Auto Assign Leads.
6. Indicate whether the step should apply to existing records in the associated account or lead list using the respective checkbox.
7. Click Save to save the step. The Step Detail screen displays with the information for the step you just created. The status of the step is Created.
8. Repeat steps 1-7 for all additional steps.
- To edit an existing step, select the checkbox for the step and click Edit Step.
- To create steps similar to existing steps you can select the checkbox for the existing step and click Copy. You can then edit the copied step.
- To delete an existing step, select the checkbox for the step and click Delete.
9. When you have finished adding steps, select each one in turn and click Activate to launch the program. The status of each step will update to Scheduled.
Return to Drip Marketing.


