Technowrites (talk | contribs) |
|||
| (43 intermediate revisions by 2 users not shown) | |||
| Line 1: | Line 1: | ||
| − | Writer. | + | The Report Writer is used to create new reports or to modify existing editable reports. The Report Writer guides you through a series of dialogs in which you name your and describe your report, select the modules that contain the data you want to report against, and choose the report criteria. |
| − | + | == Naming the Report and Selecting Modules == | |
| + | 1. Click '''Reports''' in the '''Quick Links''' section. ''The Reports screen displays.'' | ||
| − | + | 2. Click '''New Report'''. ''The Create New Report dialog displays.'' | |
| − | |||
| − | + | [[File:ScreenHunter_89 Sep. 25 15.03.jpg]] | |
| − | |||
| − | + | 3. Enter in the name and description of the report. The report name can contain letters and numbers. Do not use special characters such as quote marks. | |
| − | + | 4. Select the module which contains the primary data of your report. | |
| − | + | 5. Select related modules. This may include additional data associated with each record. For example, if you are building a forecast report, the primary data for opportunities is in the Sales module. But you can add names, company information, or custom fields from the related modules. Hold the CTRL key and click multiple related modules. | |
| − | + | 6. Click '''Next'''. | |
| − | + | [[File:ScreenHunter_90 Sep. 25 15.04.jpg]] | |
| − | + | == Selecting Report Type == | |
| − | |||
| − | |||
| − | |||
| − | |||
| − | |||
| − | |||
| − | |||
| − | |||
| − | |||
| − | |||
| − | |||
| − | |||
| − | |||
| − | |||
| − | |||
| − | |||
| − | |||
| − | |||
| − | |||
| − | |||
| − | Report Type | ||
Select Tabular or Summary as desired. Summary will provide subtotals by groupings. | Select Tabular or Summary as desired. Summary will provide subtotals by groupings. | ||
| − | + | [[File:ScreenHunter_91 Sep. 25 15.09.jpg]] | |
| − | |||
| − | |||
| − | |||
| − | |||
| − | |||
| − | |||
| − | |||
| − | |||
| − | |||
| − | |||
| − | + | == Selecting Report Fields == | |
| + | # Click the '''Fields''' tab. ''The Fields page displays.'' | ||
| + | # Click the desired report fields in the '''Available Fields''' column while holding the CTRL key down. | ||
| + | # When all desired fields have been selected, click '''Add'''. These fields will be in your report. You may edit this at any time using '''Add''' and '''Remove'''. | ||
| + | # To rearrange the order of appearance, select a field and use '''Up''' or '''Down''' buttons. The order will appear left to right on the final report. | ||
| − | |||
| − | + | == Selecting Fields to Total == | |
| − | + | '''Note:''' The '''Fields to Total''' tab does not appear if you selected '''Tabular''' report type. Make sure your report type is set to '''Summary''' if calculations are needed in the report. Numeric fields from your selection will be available for totals and subtotals. | |
| − | + | # Click the '''Fields to Total''' tab. ''The Fields to Total page displays.'' | |
| + | # Check off the type of calculation preferred. | ||
| − | + | == Using Field Alias == | |
| − | + | Field Aliases are custom column headings. You may rename any or all fields in the report. However field aliases are not currently supported for fields that have been selected as group headers. | |
| − | + | # Click the '''Field Alias''' tab. ''The Field Alias page displays.'' | |
| + | # Enter a new label for any field desired (i.e. Entity Name = Company Name). | ||
| − | |||
| − | + | == Entering Report Criteria == | |
| + | This is the most important part of building an accurate report: indicating the type of data for report. You will have access to fields in the main module as well as the related modules you selected. | ||
| − | + | Example: To find accounts in a particular city or state, choose '''Entity''' as your '''Record Type'''; this is where the account address fields and other company information resides. | |
| − | + | Example: To find sales data for a particular range of dates, choose '''Opportunity''' as your '''Record Type''' then select the '''Estimated Close Date''' field. | |
| − | + | [[File:ScreenHunter_92 Sep. 25 15.10.jpg]] | |
| − | + | # Click the '''Criteria''' tab. The Criteria page displays. | |
| + | # Select the ''Record type'' of the first criteria item. This refers to the table that data resides. | ||
| + | # Select the '''Field'''. | ||
| + | # Select the '''Condition'''. | ||
| + | # Enter the '''Criteria'''. | ||
| + | # Add additional rows as needed if you have very specific criteria. | ||
| + | # Click '''Save & Run''' or '''Save & Close'''. | ||
| − | |||
| − | + | == Tips for Entering Date Criteria == | |
| − | + | Dates must be entered in Year-Month-Day format, such as "2010-01-01". | |
| − | For | + | Some dates in the system are stored as TIMESTAMPS. When searching for a specific date and time, you can include the time portion in the criteria. For example, Date EQUALS "2010-01-01 00:00:00". |
| − | |||
| − | |||
| − | |||
| − | |||
| − | + | When using the GREATER THAN or LESS THAN conditions, if the time portion is left out On Demand assumes the beginning of the day starting at midnight 12am. | |
| − | + | For “floating” days where the date is within the “Next 60 Days” from today, use the '''Period''' field with any combination of "Equals" or "Contains" as a condition. | |
| − | |||
| − | + | == Errors == | |
| + | In the event your report has errors or shows a blank page, it is likely that you have not selected data from the proper module(s). Check the settings in your report and be sure you have selected the proper modules and respective fields. | ||
| − | |||
| − | + | Return to '''[[Reports]]''' | |
| − | |||
| − | |||
| − | |||
Latest revision as of 22:10, 2 December 2012
The Report Writer is used to create new reports or to modify existing editable reports. The Report Writer guides you through a series of dialogs in which you name your and describe your report, select the modules that contain the data you want to report against, and choose the report criteria.
Contents
Naming the Report and Selecting Modules[edit]
1. Click Reports in the Quick Links section. The Reports screen displays.
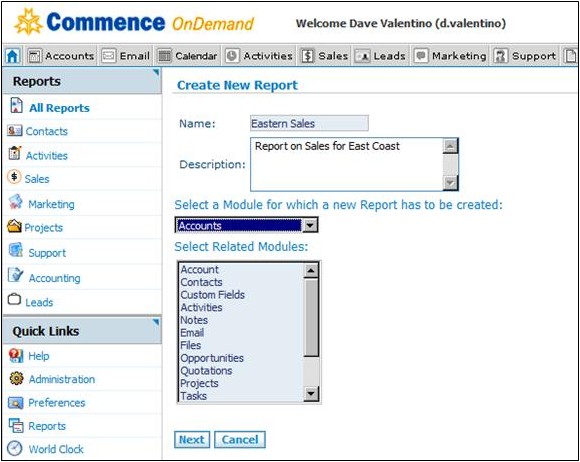
2. Click New Report. The Create New Report dialog displays.
3. Enter in the name and description of the report. The report name can contain letters and numbers. Do not use special characters such as quote marks.
4. Select the module which contains the primary data of your report.
5. Select related modules. This may include additional data associated with each record. For example, if you are building a forecast report, the primary data for opportunities is in the Sales module. But you can add names, company information, or custom fields from the related modules. Hold the CTRL key and click multiple related modules.
6. Click Next.
Selecting Report Type[edit]
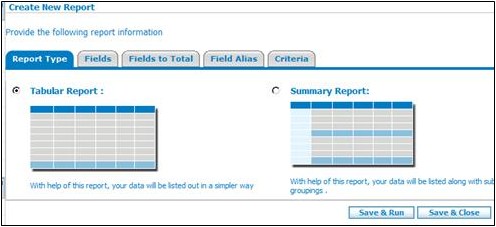
Select Tabular or Summary as desired. Summary will provide subtotals by groupings.
Selecting Report Fields[edit]
- Click the Fields tab. The Fields page displays.
- Click the desired report fields in the Available Fields column while holding the CTRL key down.
- When all desired fields have been selected, click Add. These fields will be in your report. You may edit this at any time using Add and Remove.
- To rearrange the order of appearance, select a field and use Up or Down buttons. The order will appear left to right on the final report.
Selecting Fields to Total[edit]
Note: The Fields to Total tab does not appear if you selected Tabular report type. Make sure your report type is set to Summary if calculations are needed in the report. Numeric fields from your selection will be available for totals and subtotals.
- Click the Fields to Total tab. The Fields to Total page displays.
- Check off the type of calculation preferred.
Using Field Alias[edit]
Field Aliases are custom column headings. You may rename any or all fields in the report. However field aliases are not currently supported for fields that have been selected as group headers.
- Click the Field Alias tab. The Field Alias page displays.
- Enter a new label for any field desired (i.e. Entity Name = Company Name).
Entering Report Criteria[edit]
This is the most important part of building an accurate report: indicating the type of data for report. You will have access to fields in the main module as well as the related modules you selected.
Example: To find accounts in a particular city or state, choose Entity as your Record Type; this is where the account address fields and other company information resides.
Example: To find sales data for a particular range of dates, choose Opportunity as your Record Type then select the Estimated Close Date field.
- Click the Criteria tab. The Criteria page displays.
- Select the Record type of the first criteria item. This refers to the table that data resides.
- Select the Field.
- Select the Condition.
- Enter the Criteria.
- Add additional rows as needed if you have very specific criteria.
- Click Save & Run or Save & Close.
Tips for Entering Date Criteria[edit]
Dates must be entered in Year-Month-Day format, such as "2010-01-01".
Some dates in the system are stored as TIMESTAMPS. When searching for a specific date and time, you can include the time portion in the criteria. For example, Date EQUALS "2010-01-01 00:00:00".
When using the GREATER THAN or LESS THAN conditions, if the time portion is left out On Demand assumes the beginning of the day starting at midnight 12am.
For “floating” days where the date is within the “Next 60 Days” from today, use the Period field with any combination of "Equals" or "Contains" as a condition.
Errors[edit]
In the event your report has errors or shows a blank page, it is likely that you have not selected data from the proper module(s). Check the settings in your report and be sure you have selected the proper modules and respective fields.
Return to Reports


